Updated: 17 Apr 2026, 09:28
Getting started with Git and GitHub workflows
Table of contents
Learning objectives
You will learn the basics of
- the Git distributed version control system, and
- the additional layer of functionality that GitHub adds to Git.
As a bonus, you will learn
- how to set up a public web page with GitHub Pages, and
- how to configure your code editor for a productive authoring environment.
Both Git and GitHub are independent products, and indeed one can perfectly use the one without the other. However, GitHub has been developed with git as foundational technology in mind. Hence, if you intend to use the collaborative functions of GitHub, it makes a lot of sense to also configure Git on your local machine.
To keep this document compact, you will be pointed to specific online resources as needed. Since we will merely scratch the surface, you are encouraged to follow up with the numerous online resources available, such as Git eBook, GitHub documentation or Microsoft training.
At the end of this tutorial, you will have
- installed Git on your local machine
- set up a GitHub account, created a repository and cloned it locally
- learned the fundamental concept of a commit
- applied the basic GitHub workflow (branch, pull request, merge)
- enabled GitHub Pages and created your first content page
As usual, there are multiple ways to achieve the same result. For the sake of simplicity, we will follow just one path.
There are alternatives to GitHub, such as GitLab or Bitbucket. There are also non-Git-based version control systems (e.g., Subversion) and repository hosting services (e.g., Sourceforge). But the combination of Git and GitHub has become the de-facto standard for open-source software projects and is popular at companies - hence we will focus on this particular combination.
1. Initial installation and configuration steps
1.1. Install Git
Download and install Git from the Git Project. Usually it is safe to simply click on the petrol-colored “Download for xx” button.
🖥️ Windows
The Windows installer has multiple prompts to ask you for specific installation options. Usually, you can rely on the defaults. It is crucial that you keep the option to install the Git Credential Manager: we will leverage this tool when connecting Git with GitHub later on.
🍎 macOS
I you happen to have installed Xcode, a version of git will be installed. Even so, I recommend you install git via Homebrew. On Terminal:
brew install gitIn addition, do yourself a favor and install the Git Credential Manager.
After installation, set your Git name and email. On Windows, open Git Bash (the terminal application that comes with the git installation); on macOS, open Terminal.
First, we check that git has been installed properly:
git -v
Next, type in and confirm these commands separately:
git config --global user.name "Jane Doe"
git config --global user.email "jane.doe@hwr-berlin.de"
If you plan to use Git together with GitHub, it makes sense to provide the same
nameand
By running the same commands without providing a value, confirm that the settings have been updated, e.g. for email:
git config --global user.email
Your Git installation includes a comprehensive manual. To open the manual page of a particular Git command in your browser, type
git help {command}, e.g.:git help config
1.2. Create a GitHub account
Visit the GitHub registration page and follow the workflow to create a GitHub account.
It is preferable to use the same name and email information as in the Git configuration. If you already have a GitHub account and just want to update your email address to match the git configuration, follow the instructions on GitHub Docs.
Don’t take this as advertising a commercial product, but still: You might want to consider applying for the GitHub Student Developer Pack. To profit from its benefits, your GitHub account must be linked with your HWR email address. The application workflow will ask for further proof (e.g., picture of your Student ID Card), and may check additional prerequisites, like activated two-factor authentication.
If you are a GitHub user, don’t miss to test GitHub Desktop - it’s like the GitHub web application, but running on your local machine.
1.3. Configure Visual Studio Code
If not done already, install Visual Studio Code (VS Code). VS Code automatically detects your local Git installation, so there is nothing left to configure to get you started (this was a short one, wasn’t it).
Having said that, there is a useful extension if you routinely collaborate on GitHub. To install, start VS Code, then press Shift+Ctrl+X / Shift+⌘+X, which opens the “Marketplace Extensions” side pane. Search for the GitHub Pull Requests extension (provided by GitHub), click on the proper result and install. Ensure the extension has been enabled (this will be indicated on the extension’s page). Possibly, you’ll need to restart VS Code. Next, open the GitHub extension from the side bar and sign in with your GitHub account (a workflow will guide you through the steps).
Head over to this GitHub help page to access a row of tutorials covering basic and advanced workflows with Git, GitHub and Visual Studio Code. For example, you can learn how to create a repository from within Visual Studio Code, which is one of many alternative paths to the one that follows in the next section.
2. Create a repository on GitHub and clone it locally
2.1. Create a repository on GitHub
Sign in to GitHub. On the top right, click on the “+” symbol and create a new repository. Give it a valid name, e.g., webapp. While you can leave all other settings as they are, it is good practice to:
- supply a “description” one-liner and
- add a
📄README.mdfile.
If you create the repository with these added information, the first commit1 will be created automatically for you: a 📄README.md file with the repository name as title and the description as text. If you click the ✏ Edit icon to edit this file, you will notice it uses the Markdown syntax (more specifically, the Github Flavored Markdown variant).
In a later session, we will take a look at basic markdown syntax.
2.2. Clone a local copy of the repository with the terminal
Here, I present one way to work with git and GitHub - and possibly a different one in the live lecture. I do this on purpose, since git and GitHub workflows are a ultimately matter of individual taste.
For example, you can replicate every step of this notebook with the GUI of VS Code, i.e., you don’t need to use a terminal application.
On your GitHub repository page, click on the green button that reads “Code” and copy the the “HTTPS” address of your repository, e.g. https://github.com/jane-doe/webapp.git.
Next, open a terminal application, such as Git Bash on Windows (Git Bash comes bundled with your Git installation). Navigate with the cd command to the folder where you want the local repository copy to reside. For example, navigate to the 📁C:\Users\me\projects\ folder. To clone2 the repository, type in git clone followed by the URL you just copied, such as:
git clone https://github.com/jane-doe/webapp.git
If this is the first time using Git on your local machine, the Git Credential Manager should kick in and open a separate window asking for your GitHub credentials. Follow the workflow to sign in and allow the requested access.
You will see some status messages, which should finish off with some kind of success message, such as receiving objects: 100%, [...] done.
Congratulations! You have successfully created a local copy of your remote GitHub repository and established a connection between the two. Now, you can make changes to the repository offline and synchronize when you feel this makes sense (or once you’re back online).
2.3. Maintain a 📄.gitignore file
In an actively managed local repository, Git will propose to change-track any new files that are created in its folder (including sub-folders), thus adding them to the local repository and subsequently pushing them to to the remote repository via the stage-commit-push workflow (see next section).
For most projects it makes sense to exclude specific files and folders from version control. In a typical Python project, this includes Python-created caches, the Python Virtual Environment folder, local test databases or configuration information (e.g., secrets) that should not be shared.
To exclude specific files and folders, Git interprets the special 📄.gitignore file, typically placed in the root folder of your repository. To learn more about “.gitignore”, head over to this GitHub Docs page.
Here is an exemplary 📄.gitignore file for a typical Flask web application:
# Ignore __pycache__ folder (precompiled Python code)
__pycache__/

# Ignore venv folder (Python Virtual Environment)
venv/

# Optional: ignore instance folder (used by Flask web app, e.g., for SQLite database)
instance/
Do not miss this crucial step! The Python Virtual Environment folder (e.g.,
📁venv/) in particular will give you a very hard time if it’s kept under source control. Some issues you will encounter if you don’t exclude this folder:
- The
📁venv/folder will become quite large over time, and changes to it will clutter your commit history.- A Python Virtual Environment set up on your machine will likely not work on another user’s machine.
- The file paths inside this folder might become too long for git to handle them properly, which will jeopardize the repository.
Everything in the
📁venv/folder can be recreated easily in local repositories, and does not need to be pushed to the remote repository:
- Create a Python Virtual Environment with
python -m venv venv(python3 -m venv venvon macOS)- Install the required Python packages with
pip install -r requirements.txtIn your repository, you just need to maintain a
📄requirements.txtthat lists all Python packages that your Python application requires.You create the file with this command:
pip freeze > requirements.txt
In the next section, we will switch to VS Code. However, everything can also be performed from the terminal application (see this handy Git cheat sheet listing the most common commands to follow up). Of course, the other way is also possible: You could have cloned the repository from within VS Code in the first place, without ever touching a terminal application like Git Bash.
3. Apply changes to your repository
3.1. Create your first commit with VS Code
Start VS Code, then press Ctrl+K+O / ⌘+K+O, then navigate to the folder containing the local repository.
Open 📄README.md, add some text to it and save the file with Ctrl+S / ⌘+S. Press Shift+Ctrl+G / Shift+⌘+G to open the “Source Control” side pane. In the “Message” field, type in a description of what the change will do once applied.
Writing “good” commit messages is an art in itself. If you want to get down that rabbit hole, head over to this page (if you make using Git a habit, reading that guideline is time well-spent).
Many practitioners adhere to three basic guidelines:
- Keep the commit message short, not longer than 60 characters.
- Write in present tense what the commit does to the repository.
- It follows from 1.+2. that an individual commit contains focused, incremental work: it won’t turn the entire repository upside-down.
Press Ctrl+Enter / ⌘+Enter to commit the change. You will be asked whether all changes shall be staged3 and committed in one go. Agree to this suggestion. Now you have updated the local repository with the change to the 📄README.md file.
Next, click the “Sync Changes” button and confirm: this will pull4 any changes from the remote repository to your local repository (there are none at this moment), and in a second step push5 your local commit to the remote repository (the change you just committed).
Return to the remote repository on GitHub (refresh the browser tab) to confirm that your commit has been pushed from local repository to remote repository.
3.2. Apply a quick fix to a committed change
At times, after a commit you notice a small mistake that you want to fix quickly - maybe a typo, or you want to include another file to the commit. Fortunately, Git lets you easily change the last commit:
Just fix whatever needs fixing. On the VS Code “Source Control” side pane click on the small “…” icon (“More Actions…“), then “Commit” and “Commit All (Amend)”. An editor tab opens that lets you change the commit message. Close the tab to commit the fix.
To perform the same action with Git terminal commands, first stage the change:
git add .Next, commit with the
--amendflag:git commit --amendAn editor tab (or editor window) opens that lets you change the commit message. Close the editor tab (or window) to to commit the fix.
3.3. Restore to an earlier repository state
Since Git keeps track of all the changes applied to the repository, it can automatically create a commit for you that restores the repository to an earlier state. (Think of this as a big undo button.)
Suppose we want to undo a change we applied before, say to the 📄README.md file. First, open that file.
From the VS Code “Explorer” side pane (Shift+Ctrl+E / Shift+⌘+E), open the “Timeline” section, then “Filter Timeline” for “✓ Git History”.
Click on an earlier commit to open a side-by-side comparison between current and older state (i.e., the diff view). If you found the correct commit, right-click on the timeline item and select “Copy Commit Hash”.
Open a terminal with Shift+Ctrl+P / Shift+⌘+P, terminal create new terminal. Revert to the previous state with git revert <commit-hash>..HEAD, for example:
git revert c6e0eed92329d14417faf7c26b3ca8fd7a1c9ccb..HEAD
Obviously, the commit hash will be different in your case. Note the
..HEADaddition appended to the hash: this tells git to restore all changes from the time of your selected commit up to the latest one.
An editor tab will open that lets you change the proposed commit message. In most cases you want to simply close the editor. Finally, a new commit is created with all changes applied such that in effect you have gone back in history.
The
git revertfeature is very strong motivation to keep individual commits focused, often limited to just one file.If you want to restore just a particular file from a previous commit:
git restore --source=<commit-hash> path/to/fileAnother way to restore selected files is via
git revert -n <commit hash>..HEAD. The-nflag tells Git to compute the changes and stage them (without committing). This gives you the chance to un-stage and discard any changes that you don’t want applied, before confirming the commit.
You can perform a “hard reset”, which will wipe out all commits from the database that come after the selected one:
git reset --hard <commit-hash>Use this command only in very special cases, as a last-resort option.
4. Apply a basic GitHub workflow in VS Code
4.1. A basic GitHub workflow
GitHub adds a layer of collaboration functions on top of Git. Consider the following diagram:
%%{init: {
  "theme": "neutral"
}}%%
gitGraph
	commit id: "joe commit m-1"
	commit id: "joe commit m-2"
	branch feature
	commit id: "jane commit f-1"
	commit id: "joe commit f-2"
	commit id: "pull-request-1" type: HIGHLIGHT
	commit id: "rick review f-1" tag: "comment"
	commit id: "jane review f-2"
	commit id: "rick review f-3" tag: "ready to merge"
	checkout main
	merge feature tag: "v1"
In its most basic form, the GitHub collaboration workflow discourages direct commits to the remote repository. Instead, the workflow suggests to
- create a branch6 (e.g., called
feature) - make one or multiple commits to that branch,
- file a pull request7 to propose applying the branch changes to the
mainbranch, - discuss the pull request, possibly making additional commits in the process,
- (dis-)approve to merge8 the branch commits with the
mainbranch, and finally - apply the change and delete the
featurebranch.
It is good practice to create and maintain a
📄CONTRIBUTING.mdfile that specifies the particular collaboration workflow for your repository. The Mozilla Science Lab has published a great instruction to get you started on this important topic.
4.2. Create a branch and create a commit
In VS Code, press Shift+Ctrl+P / Shift+⌘+P to open the command palette, then start typing git create branch. Select the Git: Create Branch command (not Git: Create Branch From ...). In the following prompt, provide a name, e.g., feature. Accept the command by pressing Enter.
You have just created a new branch and switched to it. By default, any commits will now be made to this branch. To try this out, change the 📄README.md file again and go through the same steps as before (you will notice that instead of “Sync Changes” the button will read “Publish Branch”).
4.3. File a pull request
For this step and the following ones, the “GitHub Pull Requests and Issues” extension must be installed and activated. Alternatively, open a browser tab pointed to the remote repository to carry out the same actions via the GitHub web application.
With the “Source Control” side pane still active, click on the small icon with the tool-tip “Create Pull Request”. Alternatively, open the command palette and start typing create pull request, then select GitHub Pull Requests: Create Pull Request.
The “GitHub Pull Request” side pane opens. Verify the correct source and destination branches are selected, complete pull request title and description, and finally create the pull request.
4.4. Review and accept the pull request, delete the branch
Since you just created the pull request, the newly created discussion board opens automatically. To access pull requests filed by others (or review your own pull requests later on), open the “GitHub Pull Requests and Issues” extension, and navigate to the pull request of interest.
The discussion board gives you multiple options, among others:
- assign roles such as reviewers to the pull request,
- leave a comment,
- review the proposed changes in a diff view,
- close the pull request (thus rejecting it), and
- merge the pull request (thus accepting it).
For now, simply click on “Merge Pull Request”, review and possibly adapt title and description to this action.
Next, click “Create Merge Commit” to execute the branch merge.
Finally, click on “Delete branch…” and confirm the selection to delete the branch you created before.
Congratulations, you have walked through a basic GitHub workflow, all from the comfort of Visual Studio Code.
Suppose you manage pull request via the GitHub web application, not VS Code plugin as described above.
When you delete the branch, it gets deleted only remotely (i.e. on GitHub), not locally on your copy of the repository. To delete the local branch:
- On the Source Control pane, make sure you are not on the branch to be deleted (e.g., you are on
mainnotfeature)- Press Shift+Ctrl+P / Shift+⌘+P to open the command palette, start typing
git delete branch- From the drop-down, choose the branch to be deleted, e.g.,
feature, and confirm your choice.
5. GitHub Pages
GitHub Pages is a webhosting service for static web pages - this is useful to host documentation, blog posts, etc. By default, web pages are available under the domain {account}.github.io/{repository}/, like this page: hwrberlin.github.io/fswd/.
The basic workflow to publish a web page via GitHub Pages is:
- Enable the “Pages” feature on an existing GitHub-hosted repository
- Configure the web page, e.g., select a theme
- Upload your content to the repository via the usual Git-based mechanisms
- After every change to the repository, GitHub spins up Jekyll to convert the content into an HTML page
- After this task has completed, the new (or changed) web page is publicly available
In the following, we will go through these steps on the example of the example repository for this course.
The basic file structure for your own GitHub Pages setup is available on the
fswd-apprepository.First,
git clonethe repository.Next, run
git switch docsto switch to thedocsbranch of the repository.You may want to copy the
📁docs/folder fromfswd-appinto your own project repository.
5.1. Enable Pages and configure the web page
From the GitHub web interface, enter the repository’s ⚙️ Settings. Under Pages, choose these settings:
- Source:
Deploy from a branch - Branch:
main, then choose the📁docs/folder - Click
Saveand wait a minute or so for the initialization to complete.
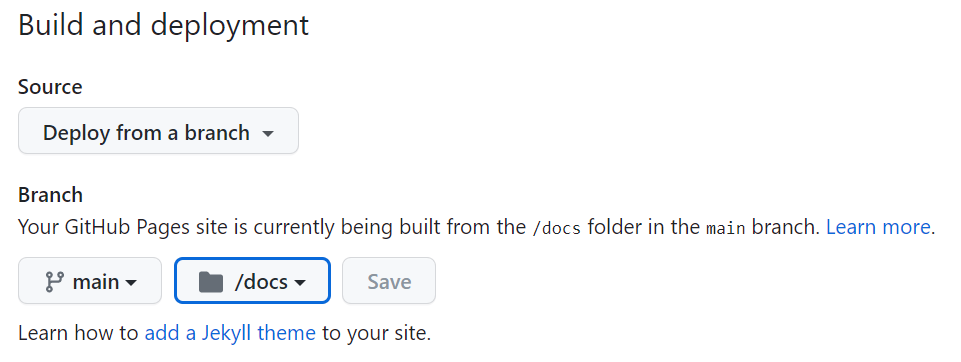
With this step completed, GitHub will look for any changes in your repository’s 📁docs/ folder. After every change, a workflow kicks in to automatically update your web page.
If you use code from the example repository as starting point for your own repo, the 📁docs/ folder will already contain a file structure. This includes the file 📄_config.yml, which tells Jekyll how you want your web page generated:
# TO-DO: replace with your Project Name
title: Project Name
# No need to change the following settings
remote_theme: just-the-docs/just-the-docs
mermaid:
  version: "11.14.0" # Pick version from https://cdn.jsdelivr.net/npm/mermaid/
color_scheme: dark
callouts:
  info:
    title: ✅ Info
    color: green
  tip:
    title: 💡 Tip
    color: yellow
  attention:
    title: ❗ Attention
    color: red
  download:
    title: 💾 Download
    color: grey-lt
Like many modern configuration files,
📄_config.ymluses the popular YAML syntax. YAML is similar to JSON, but more expressive. Also, YAML uses the “indentation instead of curly brackets” style you already know from Python.
For example, with remote_theme we tell the site generator to use the just-the-docs/just-the-docs repository as our template source.
The Jekyll site generator uses Liquid as template engine: Liquid is like Jinja, but written in Ruby, not Python.
We also defined several callout types, which is a feature specific to the chosen template.
To start with, it is sufficient to just update the title value and keep the rest as-is.
title: [Project Name]is a placeholder, i.e. replace like so:title: Todo-App.
If you want to adjust additional settings and need help later, you will usually look on these places for documentation (in this order):
- The configuration reference of the chosen template
- The configuration reference of the Jekyll application
5.2. Create content as markdown file and generate an HTML page
A typical content management system (CMS) like Wordpress works roughly as follows:
- You create content in a WYSIWYG editor.
- This content is stored in a database.
- When a user (or rather: a web browser) requests a particular web page, the CMS will pull out the requested content from its database, assemble an HTML page on-the-fly (possibly with the help of a template engine like Jinja), and serve it to the user.
- To speed up the previous step, many CMS have a caching system in place, which serves previously generated HTML pages directly.
Contrast this with GitHub Pages:
- You create content in a file that uses the markdown syntax and store it on your local repository.
- You commit and push the file from your local repository to the remote repository hosted by GitHub.
- GitHub automatically initiates a workflow. First, all markdown files in your repository are sent through Jekyll, a static web page generator: Jekyll takes your content, applies a template to it, and generates static HTML web pages. This will take some time, typically 20-40 seconds.
- Next, GitHub sends these HTML pages to its webhostig service, from which they become available under the specified URL.
- When a user requests a particular web page, the web server simply returns the already generated HTML page - no additional computing needed.
With GitHub Pages, you create all content as a series of markdown files, from which static HTML pages are generated. These HTML pages are served to the browser upon request, not the source markdown files.
Actually, Jekyll processes several types of information, which are all contained in the same file (with an
.mdending indicating markdown, e.g.,📄index.md):
- Jekyll Front Matter with YAML syntax to configure that particular web page or set common variables. Example YAML:
---
title: Home
nav_order: 0
---
- The main content with Markdown syntax. A bit confusingly, Jekyll must be configured to use GitHub-flavored markdown, despite being hosted on GitHub. This has pros and cons - if you use the starter repository, the configuration is left to the default markdown interpreter Kramdown. Example markdown:
# [Project Name]

[Project description]

## Team members

...
- Some Liquid syntax sprinkled in. This is commonly used to insert some variable or set some styling options offered by the template. This next example uses the
site.timevariable and sets a particular font size for displaying it:{: .fs-2 } Last build: {{ site.time | date: '%d %b %Y, %R%:z' }}
As an exercise, update 📄index.md with your team’s information. Then, commit and push this update.
Switch to your remote repository on GitHub. Look for a small amber circle: this indicates that a workflow is underway. Click on it to validate that the web page generation and deployment workflow is underway (click on Details for some detailed logging).
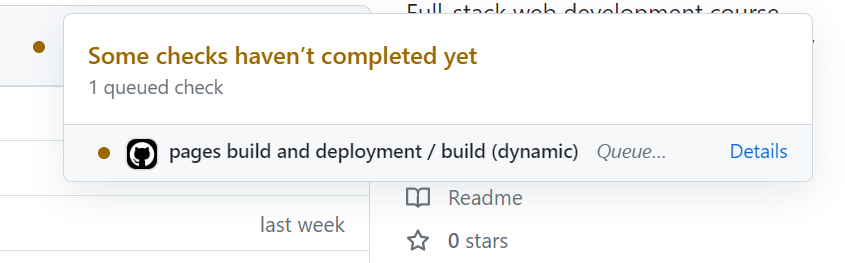
Refresh the browser view after a minute or so: the circle should be replaced by a green checkmark by now. This indicates the workflow went through smoothly.
Visit your newly generated web page, e.g, https://hwrberlin.github.io/fswd/. Validate the web page content has indeed been updated.
5.3. Configure a productive authoring environment with VS Code
You don’t want to create and edit markdown files from the GitHub web interface, but rather in a code editor like Visual Studio Code (VS Code). This will make you more productive, since:
- You author content locally, which makes you independent of internet access.
- VS Code assists you with live preview, spell checker, and other useful helpers.
- You won’t clutter the commit history with miniscule changes, since saving a file doesn’t necessarily create a commit.
- When you do commit, you’ll ensure to include a meaningful message as reference.
- Since fewer commits will happen, the GitHub Pages workflow spins up less frequently, which should help not to hit computation quotas (thus delaying web page updates).
To start with, install the following extensions (Shift+Ctrl+X / Shift+⌘+X):
- Markdown All in One by Yu Zhang
- GitHub Markdown Preview by Matt Bierner (this is a pack of multiple extensions)
- Code Spell Checker by Street Side Software
VS Code has native markdown support.
This step is therefore not mandatory - but I found the linked extensions helpful in one way or another.
As we’ve covered above, Jekyll is the static web page generator under the hood, which turns markdown files into HTML (+CSS, +JavaScript) pages. Upon every change in the 📁docs/ folder, GitHub Pages spins up Jekyll. Therefore, updates to the web page are not instantaneous, but take some time (usually under a minute).
Naturally, waiting time is a productivity killer. You have two options to cut down waiting time:
- Install, configure and run Jekyll locally on your notebook.
- Use the markdown preview feature of VS Code.
You will get the best results with (1): correct styling, proper handling of Liquid syntax, etc. But getting the environment up and running (and up-to-date) is an invest not worth for this course.
Having said that, it is sufficient to go with option (2). When you author an .md file in VS Code, you can pull up a live preview side-by-side (Ctrl+K, then V / ⌘+K, then V).
If you installed GitHub Markdown Preview by Matt Bierner as recommended above, the preview looks just like GitHub (not GitHub Pages!) would render a markdown file. It will also interpret the metadata at the top of the file (the Front Matter) and display it as a table.
In the extension’s setting you can set a “Light” theme. Personally, I like this rendering best.
The VS Code live preview rendering will not apply the correct styling template, neither will it interpret syntax specific to the Liquid templating engine (like {: .tip }). But it is certainly much better than not having a live preview at all available.
5.4. Leverage git to publish your local work
Let’s say you are happy with what your authored and want to publish your result online.
For that, synchronize your local edits with the remote repository by using the usual git workflow:
- Stage your change: often, you want to keep this limited to a single file in order to avoid merge conflicts.
- Commit your change: provide a short, but meaningful message.
- Synchronize commits, i.e., pull all commits from the remote repository and push your commit to the remote repository.
Of course, you can agree on a more elaborate workflow with your collaborators, like the one covered above.
Step 2 is worth emphasizing: supply a meaningful message with every commit! Write in present tense, not past tense. That is, do write: add some tips on VS Code configs, do not write: added some tips on VS Code configs.
Once your change has been pushed to the remote repository, GitHub Pages will automatically invoke Jekyll to update the static web site. As written before, this will take a minute or so.
Visit the web page to review how the update turned out. Ideally, everything worked as you expected.
Congratulations, you have completed your first steps with GitHub Pages, and set up VS Code for increased productivity!
Annex: Recommended interactive tutorials from GitHub
If games are more to your liking, then check out these two games that teach git commands and workflows:
- LearnGitBranching - web-based application that visualizes git commands. You can play around in sandbox, but the authored “levels” are a pretty effective crash course into git.
- Oh My Git! - standalone executable; the game has a compelling “playing cards” mechanic. It starts slowly, but picks up speed, so hang in there! Also, it’s resource-hungry especially on Windows machines.
GitHub Skills is a great resource to learn features of both Git and GitHub. To follow up with the topics introduced in this notebook, here are some recommended tutorials:
- Introduction to GitHub walks you through basically the same steps as this tutorial, but offers a sufficiently different angle for you to reinforce what you already know by now.
- Review pull request shows you a sensible workflow for managing pull requests.
- Release-based workflow walks you through more elaborate workflows that help you organize long-lived collaborative projects.
- GitHub Pages is a short step-by-step tutorial to hosting a static webpage via the GitHub Pages service.
- Hello GitHub Actions introduces you to the powerful automation engine of GitHub. With it, you are able to implement a continuous delivery and other automation pipelines for your project.
Oh Shit, Git!?! collects lighthearted, yet useful tips on trouble-shooting git issues.
Bonus: get to know the GitHub Projects feature, which may be a viable alternative to that Trello board you’ve been using in your team until now.
Copyright © 2026 Prof. Dr. Alexander Eck. All rights reserved.
Footnotes
-
Commit is a tracked change to a file or a number of files. When you commit a change, Git creates an identifier (commonly called hash or SHA) for later reference. It is good practice to create a commit message together with the commit that summarizes the included change (use present tense). The Git command is
git commit. ↩ -
Cloning means creating a local copy of a repository, usually of one that’s hosted on a remote web server. Furthermore, cloning establishes a connection between local and remote repository. This way, you can make changes locally (possibly being offline) and synchronize with the remote repository later on. The Git command is
git clone. ↩ -
Staging means that a hitherto untracked file shall be change-tracked by Git from now on (e.g., because it has been just created), or that the changes to an existing file shall be marked as going into the next commit. It is useful to think of staging as a buffer between your local file changes and the local repository: First, you change whatever you like in your local folder. Next, you put all or only a selection of changes into staging. Lastly, you commit the staged changes, which updates the local repository. (Note that synchronizing the local repository with the remote repository is yet another step.) The Git command is
git add. ↩ -
Pull means to update your local repository with any changes committed to the remote repository. The Git command is
git pull. ↩ -
Push means to update the remote repository with changes committed to the local repository. The Git command is
git push. ↩ -
Branch is an independent version of a repository. A branch creates a “parallel timeline” in which commits to that branch do not affect the source repository (or rather: the source branch). A newly created repository contains exactly one branch, which is commonly called
main. Branches separate tomainare typically short-lived, but this depends on the specific workflow adopted by a team. To avoid merge conflicts, a common practice is disallowing any changes to the source branch while conducting work on another branch. ↩ -
By filing a pull request, a user proposes to merge changes made to one branch with another branch (typically the
mainbranch). GitHub creates a pull request ID and a dedicated discussion board to track discussions, reviews, subsequent changes, and the final decision (accept or reject). ↩ -
Merge means applying changes from one branch of the repository to another branch of the same repository. An accepted pull request is supposed to be merged eventually (the default GitHub workflow assumes this will happen right after acceptance). The Git command is
git merge. ↩