Updated: 29 May 2026, 10:55
User interfaces with WTForms and Bootstrap
Table of contents
A code example accompanying this notebook is available on the
fswd-apprepository.First,
git clonethe repository.Next, run
git switch uito switch to theuibranch of the repository.The package contains the to-do web app example, as changed throughout this notebook with an updated user interface.
Learning objectives
Until now we have created all HTML and CSS manually, as well as the interaction between front-end form input and back-end form handling. This was fine for learning purposes, minimized external dependencies, and gave us great flexibility. But:
- Creating and maintaining HTML-based web forms and handling of form data in Flask soon becomes a tedious and error-prone task.
- Achieving high-quality visual results is difficult, in particular across different screen sizes.
With this notebook we will take a cursory (and therefore utterly incomplete) look at the efficient creation of useful form-based user interfaces with two popular frameworks:
- WTForms (+ Flask-WTF) and
- Bootstrap (+ Bootstrap-Flask)
WTForms helps you to define HTML-based forms and validate incoming data. Flask-WTF adds some convenient integration with Flask on top, such as automatically populating a form with request.form data if it’s available.
Bootstrap is useful to style responsive interfaces with a clever CSS design system. Bootstrap-Flask adds some time-saving macros for the Jinja templating engine.
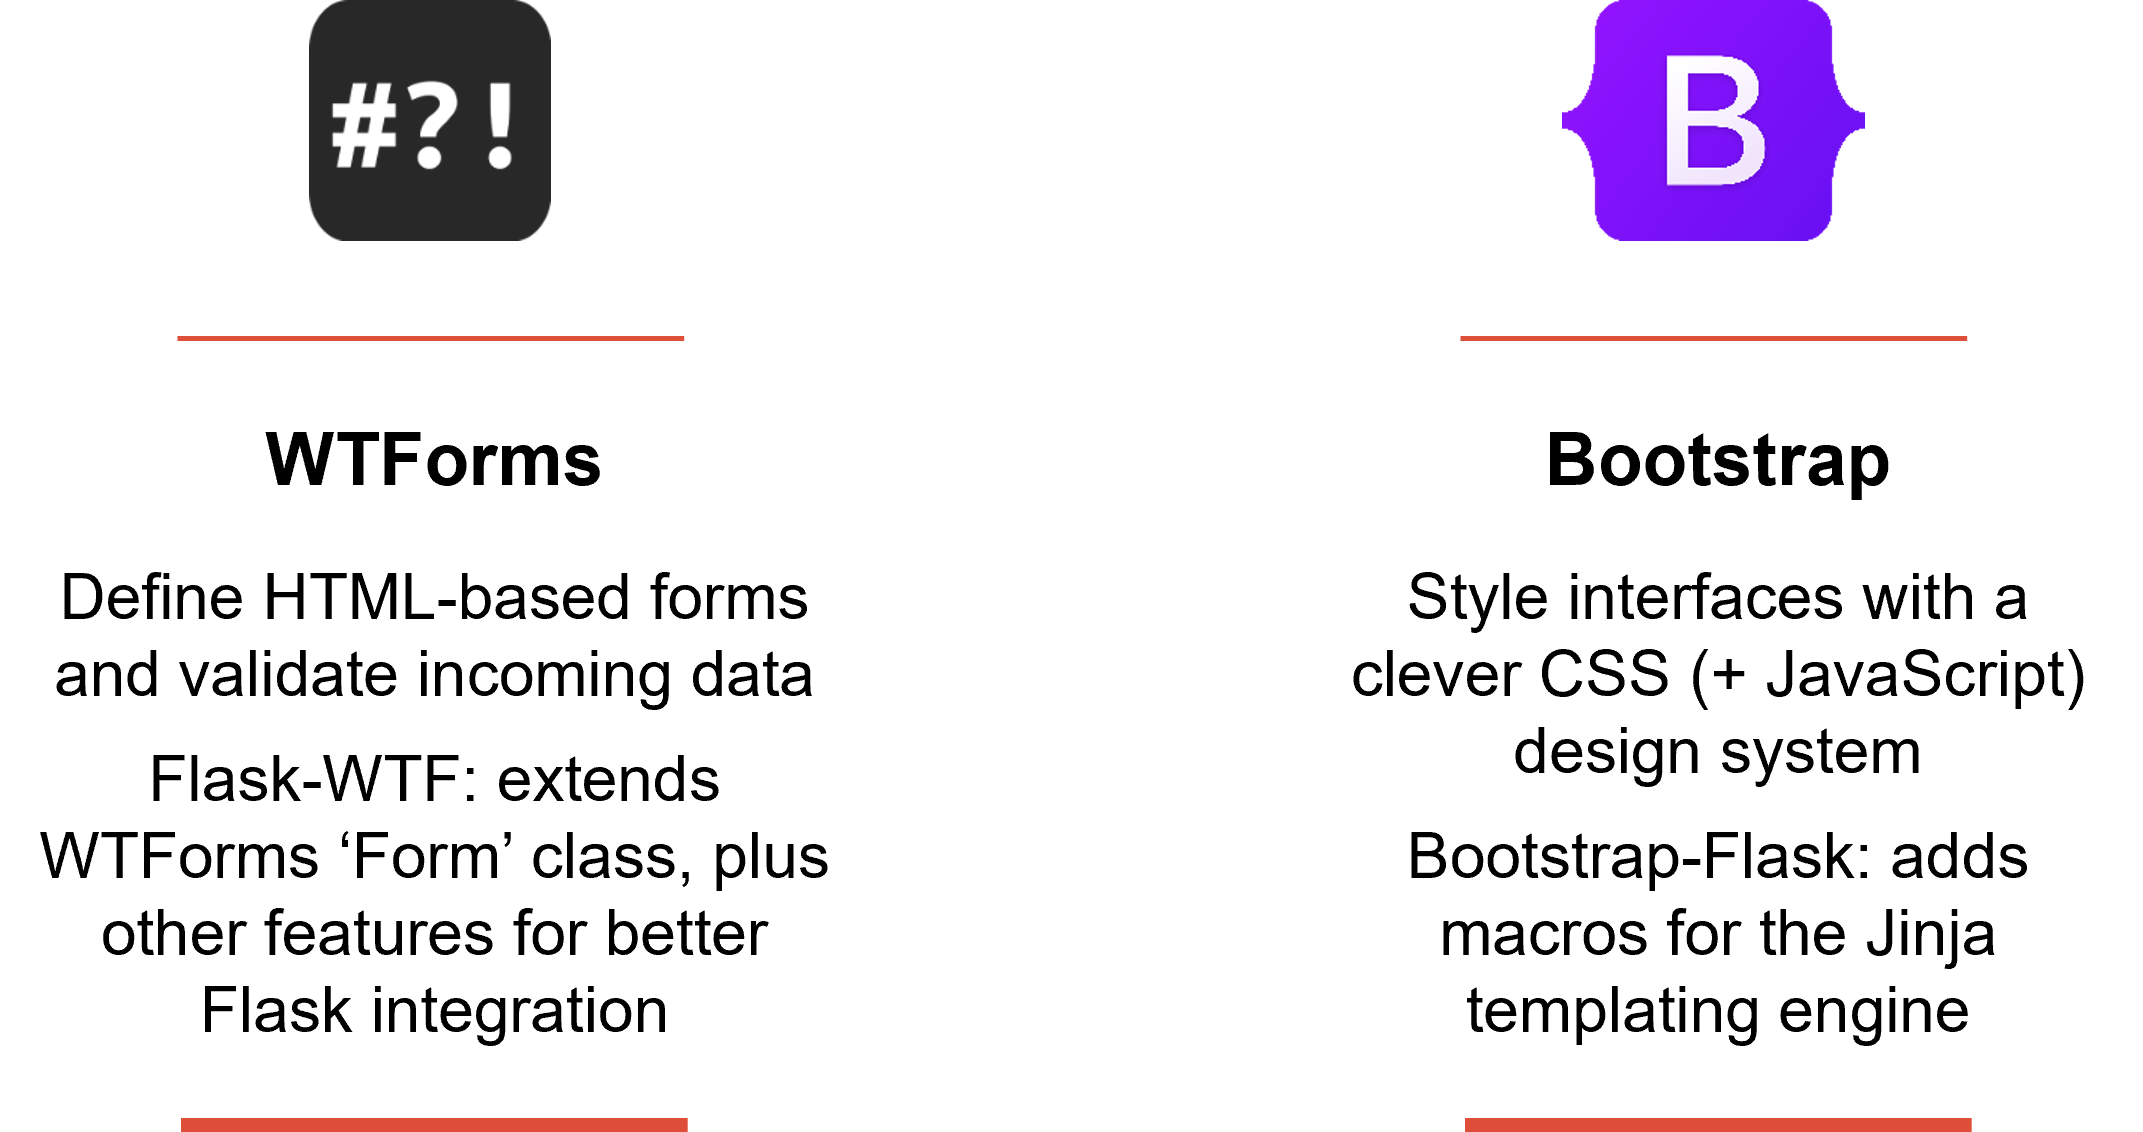
WTForms helps with form creation & handling, Bootstrap with interface styling & functionality
You might wonder why we focus on forms. The reason is simple: most web applications with a visual user interface routinely rely on HTML-based forms for user interaction.
By the end of this notebook, you will have cursory knowledge about both WTForms and Bootstrap and their usage with Flask. Having said that, these frameworks are very flexible and powerful:
- There is often more than one way to solve a specific problem.
- The feature-set is considerably broader than what we will cover here.
Hence, this notebook is all but a starting point for your own exploration of WTForms and Bootstrap.
1. Prerequisites and installation
1.1. Prerequisites
I assume that as a minimum, you have worked through the full-stack web development and Flask notebooks.
Furthermore, a project folder with a Python Virtual Environment activated and configured as instructed in those earlier notebooks should exist.
1.2. Initial installation and configuration steps
Install the following packages:
pip install flask-wtf bootstrap-flask
Do not
pip install flask-bootstrap! This package has not been maintained in many years (which is the reason whybootstrap-flaskexists in the first place).
This command will add Flask-WTF, WTForms, and Bootstrap-Flask to your existing Flask installation.
If you maintain a 📄requirements.txt (which you should): now is the time to also update this file via:
pip freeze > requirements.txt
2. Forms with WTForms and Flask-WTF
The idea behind WTForms is to define a web form (or a part thereof) as a Python class. We use this class to generate a HTML representation and to validate any incoming data.
2.1. A minimal example: form to create a new to-do item
To start with a minimal example, make a new file 📄forms.py. In it, define a form for creating a new to-do item:
from flask_wtf import FlaskForm
from wtforms.fields import StringField, SubmitField
from wtforms.validators import InputRequired, Length

class CreateTodoForm(FlaskForm):  # (1.)
    description = StringField(validators=[InputRequired(), Length(min=5)])  # (2.)
    submit = SubmitField('Create')
- Our class
CreateTodoForminherits fromFlaskForm.- This gives us access to many useful form features, some of which we will explore as we progress with this notebook.
- The individual form fields are defined as class attributes: here
descriptionandsubmit.- Notice how these attributes are instances of classes that WTForms provides to us. We will take a closer look at fields, as WTForms calls these classes, later on.
- Furthermore, notice how we defined two validators for
description: must not be empty and must be at least 5 characters. (More on validators later.)
You can easily imagine that this is the kind of form we have in mind: 
FlaskFormis the only, but crucial, dependency we maintain to Flask-WTF throughout this notebook. We’ll pull everything else directly from WTForms.
It is important to understand that you can, but don’t have to define all fields of your form in a
FlaskFormclass. For example, we could have easily omitted thesubmitattribute.
Next, we instantiate CreateToDoForm in the todos() function of 📄app.py. Rewrite todos() to the following:
import os
from flask import Flask, render_template, redirect, url_for, request, abort, flash
import db, forms

app = Flask(__name__)

app.config.from_mapping(
    SECRET_KEY='secret_key_just_for_dev_environment',
    DATABASE=os.path.join(app.instance_path, 'todos.sqlite')
)

# [...]

@app.route('/todos/', methods=['GET', 'POST'])
def todos():
    db_con = db.get_db_con()
    form = forms.CreateTodoForm()  # (1.)
    if request.method == 'GET':
        sql_query = 'SELECT * FROM todo ORDER BY id;'
        todos = db_con.execute(sql_query).fetchall()
        return render_template('todos.html', todos=todos, form=form)  # (2.)
    else:  # request.method == 'POST'
        if form.validate():  # (3.)
            sql_query = 'INSERT INTO todo (description) VALUES (?);'
            db_con.execute(sql_query, [form.description.data])  # (4.)
            db_con.commit()
            flash('Todo has been created.', 'success')  # (5.)
        else:
            flash('No todo creation: validation error.', 'warning')
        return redirect(url_for('todos'))

# [...]
- Flask-WTF uses session cookies; therefore a
SECRET_KEYvalue must be set. - Variable
formholds the class instance.- Due to the magic of Flask-WTF, the instance will be populated with data from
request.formautomatically - i.e., if the HTML form data has been submitted via HTTPPOSTmethod.
- Due to the magic of Flask-WTF, the instance will be populated with data from
- A call to
/todos/viaGETmethod will gather and render alltodos. We pass theformvariable torender_template()so it becomes available to the HTML template. (More on that in the next step.) - When we get any form data submitted via
POST, we validate whether it meets all defined criteria. (More on validation further down.) - If the data input is valid, we create a new to-do item.
- Notice how we pull the data from the
formobject, not from therequest.formobject as in the previous version oftodos()(both would work, by the way).
- Notice how we pull the data from the
- For added information, we provide some
flashmessages. (We will use this later in the Bootstrap part.)
If you run the application now, form handling will (almost) work just fine! In our 📄todos.html template there already is a form field of name description, which Flask-WTF will match with the description attribute of our CreateTodoForm class:
<form action="{{ url_for('todos') }}" method="post">
    <input type="text" name="description" />
    <input type="submit" value="Create" />
</form>
Having said that, WTForms offers a default HTML representation of form fields. To access these so-called widgets, simply call the form fields in the template page like so:
<form action="{{ url_for('todos') }}" method="post">
    {{ form.csrf_token }}
    {{ form.description }}
    {{ form.submit }}
</form>
You have certainly noticed the
csrf_tokenattribute. We did not define it ourselves, this is a security feature of WTForms called CSRF protection which Flask-WTF enforces by default.We won’t discuss CSRF (Cross-Site Request Forgery) protection here. All you need to know is that
form.validate()will only returnTrueif your form submits acsrf_token. With{{ form.csrf_token }}we ensure exactly that.Therefore, if you run the web app with the form in its previous form (i.e. without
csrf_token) the validation step will fail, and no to-do item will be created. Knowing that, the following form will validate just fine:<form action="{{ url_for('todos') }}" method="post"> {{ form.csrf_token }} <input type="text" name="description" /> <input type="submit" value="Create" /> </form>This little example illustrates how you can use just the parts of WTForms you like (e.g., data validation) and ignore the others (e.g., widgets).
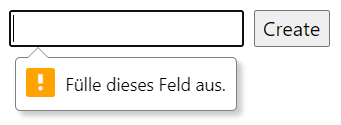
Crucially, the HTML element generated by form.description includes HTML-native constraint validation, if corresponding validators have been defined in the field instance.
In our example, these are required and minlength="5", which correspond to the InputRequired() and Length(min=5)] validators, respectively.
HTML constraint validation is enforced directly by the browser, with no additional effort to the developer. For instance, when the user doesn’t enter any value, the required validation will kick in, causing a warning to pop up automatically (visuals vary between browsers):
Of course, you are free to add such HTML-based validation manually as HTML element attributes. WTForms unburdens you from this task, which saves you some time.
In the next section, we investigate key WTForms concepts more closely, in particular fields and validators.
2.2. WTForms fields and validators
WTForms is built around four key concepts:
- Field: holds a specified form element, e.g., a text input. WTForms offers various classes that define different field types, e.g.,
StringFieldfor a text input. A field comes with useful attributes, such asdata,label,validators, andwidget.- You may define your own field classes if you like.
- Validator: specifies a criterion against which a field’s
datais checked, e.g., minimum length. You may provide a list of multiple validators. When all criteria are met, validation returnsTrueandFalseotherwise.- Defining custom validators is possible.
- Widget: the HTML representation of a field. Usually, you will use the default widget that comes with a field type (e.g.,
<input type="text">for aStringField).- You may create a custom widget for a particular field.
- Form: a class that typically contains at least one field. To access a form field, write either
foo_form.bar_field(common approach) orfoo_form['bar_field'](rarely used).- We generally use
FlaskFormfrom the Flask-WTF package, which is a sub-class of WTFormsForm.
- We generally use
These are the built-in field classes of WTForms and their corresponding widgets:
| Field class name | Description | Default widget type |
|---|---|---|
| Selections | ||
BooleanField | Choose True or False with checkbox | <input type="checkbox"> |
RadioField | Choose via radio button selection | <input type="radio"> |
SelectField | Choose via drop-down menu | <select><option></option></select> |
SelectMultipleField | Choose one or multiple items from a list | <select multiple><option></option></select> |
| Date and time | ||
MonthField | Enter a year and a month (stored as datetime.date, with day=1) | <input type="month"> |
DateField | Enter a date (stored as datetime.date) | <input type="date"> |
TimeField | Enter a time (stored as datetime.time) | <input type="time"> |
DateTimeLocalField | Enter both a date and a time (stored as datetime.datetime) | <input type="datetime-local"> |
DateTimeField | Alternative to above - avoid usage, though! | <input type="datetime"> |
| Numbers | ||
DecimalField | Enter a decimal number (stored as decimal.Decimal) | <input type="number" step="any"> |
FloatField | Enter a decimal number (stored as float) - avoid, use DecimalField instead | <input type="text"> |
IntegerField | Enter a number (stored as int) | <input type="number"> |
DecimalRangeField | Select a decimal number via a slider | <input type="range" step="any"> |
IntegerRangeField | Select a number via a slider | <input type="range"> |
| Strings | ||
EmailField | Enter an email address | <input type="email"> |
PasswordField | Enter a password | <input type="password"> |
SearchField | Enter a search term - functionally same as StringField | <input type="search"> |
StringField | Enter some text | <input type="text"> |
TelField | Enter a phone number | <input type="tel"> |
TextAreaField | Enter some text, input area spans multiple lines | <textarea></textarea> |
URLField | Enter an URL | <input type="url"> |
| Files | ||
FileField | Let user select a file for upload | <input type="file"> |
MultipleFileField | Let user select multiple files for upload | <input type="file" multiple> |
| Others | ||
HiddenField | Include hidden value to the form, e.g., an ID | <input type="hidden"> |
SubmitField | Button to submit the form | <input type="submit"> |
These are the standard WTForms validator classes:
| Validator class name | Description |
|---|---|
AnyOf | Validate against a collection of provided values - True if a match |
DataRequired | Validate if a field’s data is truthy, e.g., number 0 returns False - avoid, use InputRequired instead |
Email | Validate e-mail address, external dependency: pip install email-validator |
EqualTo | Compare with data of another field - useful for password confirmation of registration form |
InputRequired | Validate if field contains some data |
IPAdress | Validate an IP address (IPv4 format by default) |
Length | Validate string length (number of characters) - provide min and/or max values |
MacAddress | Validate a MAC address |
NoneOf | Validate against a collection of provided values - True if no match |
NumberRange | Validate for a numeric range - provide min and/or max values |
Optional | If data in the field is empty, skip all other validators of this field |
Regexp | Validate against regular expression provided via regex value |
URL | Validate for URL format |
UUID | Validate for UUID format |
2.3. Another example: form to edit a to-do item
Equipped with this knowledge, define a TodoForm class for editing an individual to-do item. Extend 📄forms.py with:
class TodoForm(FlaskForm):  # (1.)
    method = HiddenField()  # (2.)
    id = HiddenField()
    complete = BooleanField()
    description = StringField(validators=[InputRequired()])
    list_id = SelectField(coerce=int, choices=[], validate_choice=False)  # (3.)
    submit = SubmitField('Update')
- The form mostly corresponds to our to-do item data model (shown here), which makes complete sense.
- Notice the
methodattribute, which holds aHiddenField: we leverage this in the template to differentiate between aPATCHandDELETEcall, since HTML forms give us justGETandPOST.- This is a little hack, but not an uncommon one.
- The form can refer to at most one to-do list item.
- This is a limitation compared with our data model, in which we allow a to-do item to belong to more than one list item. (Mostly done to decrease code complexity in this notebook.)
SelectMultipleFieldinstead ofSelectFieldwould be more true to our data model.- The values passed with the constructor are needed in our case, since (1) we want to store an integer value and (2) we will pull the individual choices dynamically from the database.
The function todo(id) in 📄app.py must be reorganized ever so slightly to use our new TodoForm class:
@app.route('/todos/<int:id>', methods=['GET', 'POST'])
def todo(id):
    db_con = db.get_db_con()
    if request.method == 'GET':
        sql_query = (
            'SELECT * FROM '
            '( SELECT * FROM todo '
                'LEFT JOIN todo_list '
                'ON todo.id=? AND todo_id=todo.id ) '
            'WHERE id=?;'
        )
        todo = db_con.execute(sql_query, [id, id]).fetchone()
        if todo:
            form = forms.TodoForm(data=todo)  # (1.)
            sql_query = 'SELECT id, name FROM list ORDER BY name;'
            choices = db_con.execute(sql_query).fetchall()  # (2.)
            form.list_id.choices = [(0, 'List?')] + [(c['id'], c['name']) for c in choices]
            return render_template('todo.html', form=form)  # (3.)
        else:
            abort(404)
    else:  # request.method == 'POST'
        form = forms.TodoForm()
        if form.method.data == 'PATCH':  # (4.)
            if form.validate():  # (5.)
                sql_query = 'UPDATE todo SET complete = ?, description = ? WHERE id = ?;'
                db_con.execute(sql_query, [form.complete.data, form.description.data, id])
                sql_query = 'DELETE FROM todo_list WHERE todo_id = ?;'
                db_con.execute(sql_query, [id])
                if form.list_id.data:
                    sql_query = 'INSERT INTO todo_list (todo_id, list_id) VALUES (?, ?);'
                    db_con.execute(sql_query, [id, form.list_id.data])
                db_con.commit()
                flash('Todo has been updated.', 'success')
            else:
                flash('No todo update: validation error.', 'warning')
            return redirect(url_for('todo', id=id))
        elif form.method.data == 'DELETE':
            sql_query = 'DELETE FROM todo WHERE id = ?;'
            db_con.execute(sql_query, [id])
            db_con.commit()
            flash('Todo has been deleted.', 'success')
            return redirect(url_for('todos'), 303)
        else:
            flash('Nothing happened.', 'info')
            return redirect(url_for('todo', id=id))
- In the
GETpart we fetch the to-do item from the database and store it intodo. Then, we create an instance ofTodoFormnamedform, to which we pass thetodoobject asdatavalue.- WTForms automatically matches the entries of
todowith corresponding form fields to populate theirdataattributes.
- WTForms automatically matches the entries of
- Remember the
list_id = SelectField()in the form definition? Here we pull all choices from the database, i.e., alllist.idvalues, plus thelist.namefor user-friendly display.- In the next line we process the result with a list comprehension: first, to add an “empty” entry; and second, to create the data structure which
SelectFieldrequires.
- In the next line we process the result with a list comprehension: first, to add an “empty” entry; and second, to create the data structure which
- Notice that we pass just the
formobject to the template, since it also contains all necessarytodoinformation for display. (We’ll update📄todo.htmlin the next paragraph.) - Here we leverage the
methodhidden field: a form that submitted aPATCHvalue will pass thisifcondition. (Again, we’ll need to update📄todo.htmla bit.)- In the previous version of
todo(id)we relied on a JavaScript workaround that resulted in properPATCHandDELETEHTTP method calls. To increase compatibility with WTForms we got rid of JavaScript and use this approach instead.
- In the previous version of
- The to-do item will be updated only after successful validation.
- In our example, the browser already ensures validity. Nevertheless: you never know what happens between browser submission in the front-end and arrival in the back-end, so better re-validate here as well.
Next, rewrite 📄todo.html to adapt to the change of provided object, namely from todo (an sqlite3 class instance) to form (a Flask-WTF class instance):
{% extends 'base.html' %}

{% block HEADER %}
    <h2>{% block TITLE %}To-do "{{ form.description.data }}"{% endblock %}</h2>
{% endblock %}

{% block CONTENT %}
<form action="{{ url_for('todo', id=form.id.data) }}" method="post">  <!-- (1.) -->
    {{ form.method(value='PATCH') }}  <!-- (2.) -->
    {{ form.csrf_token }}
    {{ form.complete }}
    {{ form.description }}
    {{ form.list_id }}
    {{ form.submit }}
</form>
<form action="{{ url_for('todo', id=form.id.data) }}" method="post">  <!-- (3.) -->
{{ form.method(value='DELETE') }}
<input type="submit" value="Delete">
</form>
{% endblock %}
- To access to-do item values, use the
dataargument of the corresponding field, e.g.,form.id.data.- Previously, we passed the template a
todoobject, from which we accessedtodo.id,todo.description, etc.
- Previously, we passed the template a
- WTForms lets us pass arbitrary arguments to a form field, which its widget (i.e., the HTML representation) processes. In most cases the widget will simply add HTML attributes of the same key and value.
- Hence, with
form.method(value='PATCH')we tell the widget to render theHiddenFieldas<input type="hidden" name="method" value="PATCH">. - Likewise,
form.method(value='PATCH', class='my_css_class')would render to<input type="hidden" name="method" value="PATCH" class="my_css_class">.
- Hence, with
- We define a second form with just an
<input type="hidden" name="method" value="DELETE">field and an<input type="submit">button.- On the back-end, our
todo(id)control flow will jump into theelif form.method.data == 'DELETE':code block.
- On the back-end, our
This template results into the following form:
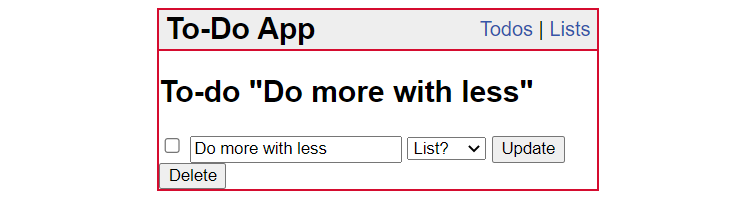
While this form is fully functional, it is neither very pleasing visually, nor is it user-friendly. In the following section, we introduce Bootstrap and Bootstrap-Flask to create something like this:
3. Styling with Bootstrap and Bootstrap-Flask
Bootstrap is a comprehensive, systematic collection of CSS rules that covers virtually any HTML element. Additional functionality is provided transparently through custom JavaScript functions, such as a dismiss button for alert components.
Due to its popularity, the Bootstrap design system has been ported to common prototyping tools like Figma:
- Bootstrap 5 UI Kit
- Alternative Bootstrap 5 UI Kit.
3.1. A minimal example: alert component
To start using Bootstrap, you simply add its CSS (and optionally JavaScript) to your web application. All HTML elements will then be styled according to the visual design choices of the Bootstrap team. In a sense, Bootstrap is the exact opposite of CSS reset rules.
When you migrate from your own CSS to Bootstrap, it is best to completely get rid of your CSS, since this could (and likely will) interfere with Bootstrap.
While Bootstrap is helpful by default, its true power comes to life with its class-based system for further customization. For example, to style a <div> HTML element as a container for alerts, you could write something like this:
<div class="alert alert-warning">A simple warning alert</div>
…which renders to this:

The same HTML element, but with <div class="alert"> only renders to this:

If we wanted to create a dismissible warning alert, an additional <button> element with adequate CSS styling (and a data-bs-dismiss attribute consumed by its accompanying JavaScript code) is needed:
<div class="alert alert-warning alert-dismissible fade show">
    A dismissible warning alert
    <button type="button" class="btn-close" data-bs-dismiss="alert"></button>
</div>
This is a rendering (a click on the x would fade out the alert):

For completeness, here is an excerpt of the CSS rules that styled the alerts seen above:
.alert { --bs-alert-bg: transparent; --bs-alert-padding-x: 1rem; --bs-alert-padding-y: 1rem; --bs-alert-margin-bottom: 1rem; --bs-alert-color: inherit; --bs-alert-border-color: transparent; --bs-alert-border: var(--bs-border-width) solid var(--bs-alert-border-color); --bs-alert-border-radius: var(--bs-border-radius); --bs-alert-link-color: inherit; position: relative; padding: var(--bs-alert-padding-y) var(--bs-alert-padding-x); margin-bottom: var(--bs-alert-margin-bottom); color: var(--bs-alert-color); background-color: var(--bs-alert-bg); border: var(--bs-alert-border); border-radius: var(--bs-alert-border-radius); } .alert-warning { --bs-alert-color: var(--bs-warning-text-emphasis); --bs-alert-bg: var(--bs-warning-bg-subtle); --bs-alert-border-color: var(--bs-warning-border-subtle); --bs-alert-link-color: var(--bs-warning-text-emphasis); } .alert-dismissible { padding-right: 3rem; } .fade { transition: opacity 0.15s linear; } .fade:not(.show) { opacity: 0; }And this is an excerpt of the various CSS rules with which to style grid columns:
.col { flex: 1 0 0%; } .col-auto { flex: 0 0 auto; width: auto; } .col-1 { flex: 0 0 auto; width: 8.33333333%; } .col-2 { flex: 0 0 auto; width: 16.66666667%; } .col-3 { flex: 0 0 auto; width: 25%; } .col-4 { flex: 0 0 auto; width: 33.33333333%; }We could go on like this for virtually thousands of lines of CSS! As you can see, Bootstrap is mostly a collection of CSS rules - but a very comprehensive and systematic one.
3.2. Apply Bootstrap to web app via Bootstrap-Flask
It is completely viable to apply Bootstrap to your web application manually.
However, you will likely appreciate the helping hand of Bootstrap-Flask once you start using its various Jinja macros in your templates.
To initialize, we add three lines in 📄app.py:
import os
from flask import Flask, render_template, redirect, url_for, request, abort, flash
from flask_bootstrap import Bootstrap5  # (1.)
import db, forms

app = Flask(__name__)

app.config.from_mapping(
    SECRET_KEY = 'secret_key_just_for_dev_environment',
    DATABASE = os.path.join(app.instance_path, 'todos.sqlite'),
    BOOTSTRAP_BOOTSWATCH_THEME = 'pulse'  # (2.)
)
app.cli.add_command(db.init_db)
app.teardown_appcontext(db.close_db_con)

bootstrap = Bootstrap5(app)  # (3.)

@app.route('/index')
@app.route('/')
def index():
	return redirect(url_for('todos'))

# [...]
- First, we import the
Bootstrap5class. - Next, we may change the theme (e.g., color codes and fonts) to an alternative -
'pulse'in this example.- This is an optional step - click here for more information.
- Finally, we instantiate
Bootstrap5, which makes the Jinja macros available to us.
This is all we need to change in our back-end business logic. The remainder is done in our templates.
As the very minimum, we should change 📄base.html to resemble the Bootstrap standard:
<!doctype html>
<html lang=en>
<head>
<meta charset="utf-8">
<meta name="viewport" content="width=device-width, initial-scale=1"> <!-- (1.) -->
<title>{% block TITLE %}{% endblock %} - To-Do App</title>
{{ bootstrap.load_css() }} <!-- (2.) -->
</head>
<body>
<nav>
<h1>To-Do App</h1>
<a href="{{ url_for('todos') }}">Todos</a>
|
<a href="{{ url_for('lists') }}">Lists</a>
</nav>
<header>{% block HEADER %}{% endblock %}</header>
<main>
{% block CONTENT %}{% endblock %}
</main>
{{ bootstrap.load_js() }} <!-- (3.) -->
</body>
</html>
- We have extended
📄base.htmlto the recommendation of Bootstrap, for example by including this<meta>element. - We don’t hard-code a link to the Bootstrap CSS file, but rather let Bootstrap-Flask do this.
- The CSS file is pulled from an internet resource hosted by Bootstrap.
- The same applies to the Bootstrap JavaScript code, which by convention is placed right before the
</body>end tag.
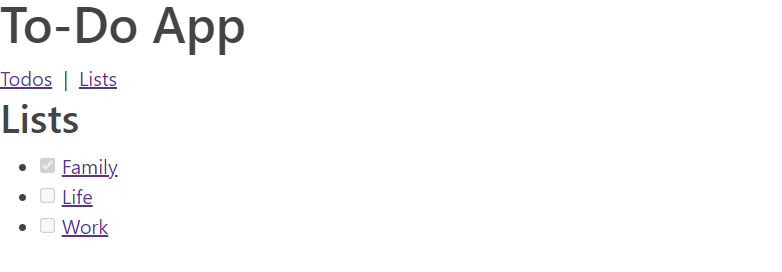
This already has an effect - the web app renders to something similar like this:
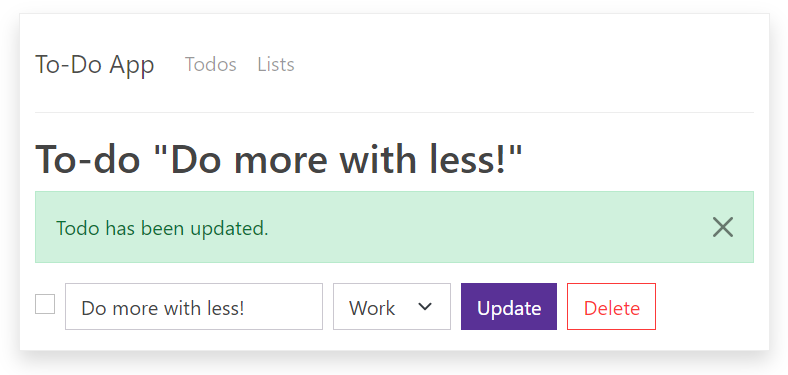
We want to apply more styling. So we experiment with various Bootstrap components until we achieve a satisfactory result, like this one:
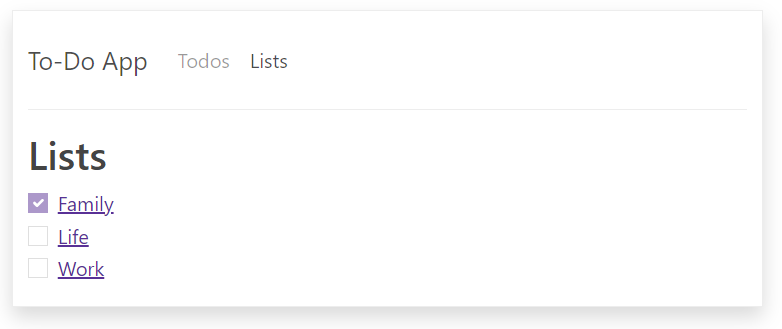
For this effect, we used in particular these Bootstrap components:
- Border and shadow
- Navigation bar
- The Bootstrap-Flask
render_nav_item()Jinja macro is useful as well.
- The Bootstrap-Flask
- Checkbox
- Alerts
- Bootstrap-Flask offers the convenient
render_messages()macro for easy integration with Flask flash messaging.
- Bootstrap-Flask offers the convenient
For reference, here is 📄base.html with all visual tweaks applied:
{% from 'bootstrap5/nav.html' import render_nav_item %}
{% from 'bootstrap5/utils.html' import render_messages %}

<!doctype html>
<html lang=en>

<head>
    <meta charset="utf-8">
    <meta name="viewport" content="width=device-width, initial-scale=1">
    <title>{% block TITLE %}{% endblock %} - To-Do App</title>
    {{ bootstrap.load_css() }}
</head>

<body>
<div class="container border shadow w-50 pb-3 my-3">

    <nav class="navbar navbar-expand-xl border-bottom mb-3">
        <div class="container-fluid px-0">
            <a class="navbar-brand" href="{{ url_for('index') }}">To-Do App</a>
            <button class="navbar-toggler" type="button" data-bs-toggle="collapse"
                    data-bs-target="#navbarSupportedContent"
                    aria-controls="navbarSupportedContent"
                    aria-expanded="false" aria-label="Toggle navigation">
                <span class="navbar-toggler-icon"></span>
            </button>
            <div class="collapse navbar-collapse" id="navbarSupportedContent">
                <ul class="navbar-nav me-auto mb-2 mb-lg-0">
                    {{ render_nav_item('todos', 'Todos') }}
                    {{ render_nav_item('lists', 'Lists') }}
                </ul>
            </div>
        </div>
    </nav>

    <header>{% block HEADER %}{% endblock %}</header>

    <main>
        {{ render_messages(dismissible=True, dismiss_animate=True) }}
        {% block CONTENT %}{% endblock %}
    </main>

</div>
{{ bootstrap.load_js() }}
</body>

</html>
All other templates can do with some visual tweaks as well. For example, here is the updated 📄todo.html:
{% extends 'base.html' %}

{% block HEADER %}
    <h2>{% block TITLE %}To-do "{{ form.description.data }}"{% endblock %}</h2>
{% endblock %}

{% block CONTENT %}
<div class="row row-cols-auto g-3">
    <form action="{{ url_for('todo', id=form.id.data) }}" method="post" class="col">
    <div class="row row-cols-auto g-2">
        {{ form.method(value='PATCH') }}
        {{ form.csrf_token }}
        <div class="col">{{ form.complete(class='form-check-input align-middle') }}</div>
        <div class="col">{{ form.description(class='form-control') }}</div>
        <div class="col">{{ form.list_id(class='form-select') }}</div>
        <div class="col">{{ form.submit(class='btn btn-primary') }}</div>
    </div>
    </form>
    <form action="{{ url_for('todo', id=form.id.data) }}" method="post" class="col">
    <div class="row row-cols-auto">
        {{ form.method(value='DELETE') }}
        <div class="col gx-2"><input type="submit" value="Delete" class="btn btn-outline-danger"></div>
    </div>
    </form>
</div>
{% endblock %}
3.3. Working with Bootstrap: a matter of trial and error
At this point you are likely wondering how to come up with an intricate <button> definition like:
<button class="navbar-toggler" type="button" data-bs-toggle="collapse"
        data-bs-target="#navbarSupportedContent"
        aria-controls="navbarSupportedContent"
        aria-expanded="false" aria-label="Toggle navigation">
    <span class="navbar-toggler-icon"></span>
</button>
The answer is straightforward: working with Bootstrap is very much repeated trial and error, plus accumulated experience.
You will consult a combination of:
- The Bootstrap documentation (ensure you use the correct version),
- Stack Overflow,
- Generative AI chatbots like ChatGPT,
- Your very own Bootstrap creations from the past, and
- Live experimentation with help of the browser developer tools of your choice, such as Firefox or Chrome.
This last resource is very powerful: for example, you can easily change class assignments on-the-fly and see the effect instantaneously:

Annex: Follow-up recommendations
Congratulations, you have another tool in the full-stack arsenal under your belt!
At this point it is time for you to dive into more practical experiments with WTForms and Bootstrap:
- Start by further investigating the
fswd-apprepository, in particular the templates📄base.html,📄todos.html, and📄todo.html. - Take a look at more tutorials (preferably of a recent date), like this one about Flask-WTF on DigitalOcean.
- Browse through the Bootstrap documentation with activated browser developer tools (Shift+Ctrl+I / ⌥+⌘+I) and manipulate the reference examples shown on the documentation.
Copyright © 2026 Prof. Dr. Alexander Eck. All rights reserved.